LZW' Blog

  • Startseite

  • Archiv

PIL 使用

Veröffentlicht am 2019-07-02 in 编程

Pillow 是PIL全称,是一个python图像处理库,由Fredrik Lundh and Contributors创建的。

安装

basic
1
$ pip install Pillow

基本上安装python和pip就可以安装pil。

入门教程

Image class

PIL中最重要的类是Image,定义在PIL 底下的Image中。可以通过以下方式来创建一个Image类对象:

  • 通过打开一个图片文件来创建
  • 通过处理其他的图片
  • 从头创建图片

从图片文件中打开文件的:

1
2
from PIL import Image
im = Image.open('pic.png')

如果成功,函数会返回一个Image对象。可以通过检查它的属性来查看它的内容:

1
print(im.format, im.size, im.mode)

其中,

  • im.format是该图片的来源,如果不是来自图像文件,则会使None
  • im.size是图片的大小,是一个二维数组,单位是pixel
  • im.mode 是图片的显示模式,定义了图片的色带个数和名字;或像素的类型和深度;常见的模式有“L”是灰度图,“RGB”是真彩图片,“CMYK”是预印图片。

如果文件不能打开,则会返回一个IOError异常。

图片的显示:

1
im.show()

图片的保存:

1
im.save("...")

其他的图像打开方式:

从打开的文件中读取:
1
2
3
from PIL import Image
with open("hopper.ppm", "rb") as fp:
im = Image.open(fp)
从string中读取:
1
2
3
import StringIO

im = Image.open(StringIO.StringIO(buffer))
从tar文件中读取
1
2
3
4
from PIL import Image, TarIO

fp = TarIO.TarIO("Tests/images/hopper.tar", "hopper.jpg")
im = Image.open(fp)

读写图片

将文件转换成JPEG

1
2
3
4
5
6
7
8
9
10
11
import os, sys
from PIL import Image

for infile in sys.argv[1:]:
f, e = os.path.splitext(infile)
outfile = f + ".jpg"
if infile != outfile:
try:
Image.open(infile).save(outfile)
except IOError:
print("cannot convert", infile)

思路是将文件打开,再保存到jpeg文件即可。需要注意,打开文件需要try except以防IOError

创建JPEG文件的缩略图

1
2
3
4
5
6
7
8
9
10
11
12
13
14
import os, sys
from PIL import Image

size = (128, 128)

for infile in sys.argv[1:]:
outfile = os.path.splitext(infile)[0] + ".thumbnail"
if infile != outfile:
try:
im = Image.open(infile)
im.thumbnail(size)
im.save(outfile, "JPEG")
except IOError:
print("cannot create thumbnail for", infile)

思路是使用自带的thumbnai函数。

鉴定图片

1
2
3
4
5
6
7
8
9
10
from __future__ import print_function
import sys
from PIL import Image

for infile in sys.argv[1:]:
try:
with Image.open(infile) as im:
print(infile, im.format, "%dx%d" % im.size, im.mode)
except IOError:
pass

剪切合并图片

Image class可以通过crop()函数来提取局部区域图片。

复制图像的一个长方形区域:
1
2
box = (100, 100, 400, 400)
region = im.crop(box)

box是一个四维tuple,定义了(左,上,右,下)。该库的坐标系是将左上角定义为原点(0,0),同时所采用的距离是pixel。

处理长方形区域并paste回去
1
2
region = region.transpose(Image.ROTATE_180)
im.paste(region, box)

paste函数要求region和box需要一致。

分离合并图像channel
1
2
r, g, b = im.split()
im = Image.merge("RGB", (b, g, r))

集合转换

图片resize和旋转
1
2
out = im.resize((128, 128))
out = im.rotate(45) # degrees counter-clockwise
图片翻转
1
2
3
4
5
out = im.transpose(Image.FLIP_LEFT_RIGHT)
out = im.transpose(Image.FLIP_TOP_BOTTOM)
out = im.transpose(Image.ROTATE_90)
out = im.transpose(Image.ROTATE_180)
out = im.transpose(Image.ROTATE_270)

颜色转换

不同图像mode转换
1
2
from PIL import Image
im = Image.open("hopper.ppm").convert("L")

图像增强

过滤
1
2
from PIL import ImageFilter
out = im.filter(ImageFilter.DETAIL)
点操作

用于操作图像的像素值。

应用点操作
1
2
# multiply each pixel by 1.2
out = im.point(lambda i: i * 1.2)
处理单个通道
1
2
3
4
5
6
7
8
9
10
11
12
13
14
15
16
# split the image into individual bands
source = im.split()

R, G, B = 0, 1, 2

# select regions where red is less than 100
mask = source[R].point(lambda i: i < 100 and 255)

# process the green band
out = source[G].point(lambda i: i * 0.7)

# paste the processed band back, but only where red was < 100
source[G].paste(out, None, mask)

# build a new multiband image
im = Image.merge(im.mode, source)
增强图片
1
2
3
4
from PIL import ImageEnhance

enh = ImageEnhance.Contrast(im)
enh.enhance(1.3).show("30% more contrast")

图像序列

PIL支持FLI、FLC、GIF等图像序列文件。

当使用图像序列文件,PIL会自动地打开序列中的第一帧。可以使用seek和tell方法来移动帧。

读取序列

1
2
3
4
5
6
7
8
9
10
11
from PIL import Image

im = Image.open("animation.gif")
im.seek(1) # skip to the second frame

try:
while 1:
im.seek(im.tell()+1)
# do something to im
except EOFError:
pass # end of sequence

在序列停止的时候,会返还一个EOFError。

使用ImageSequen Iterator class

1
2
3
from PIL import ImageSequence
for frame in ImageSequence.Iterator(im):
# ...do something to frame...

Postscript printing

用Postscript printers来打印图片文本和图像

Drawing Postscript

1
2
3
4
5
6
7
8
9
10
11
12
13
14
15
16
17
18
19
from PIL import Image
from PIL import PSDraw

im = Image.open("hopper.ppm")
title = "hopper"
box = (1*72, 2*72, 7*72, 10*72) # in points

ps = PSDraw.PSDraw() # default is sys.stdout
ps.begin_document(title)

# draw the image (75 dpi)
ps.image(box, im, 75)
ps.rectangle(box)

# draw title
ps.setfont("HelveticaNarrow-Bold", 36)
ps.text((3*72, 4*72), title)

ps.end_document()

Normalize中的mean和std

Veröffentlicht am 2019-07-02 in machine learning

实验过程遇到了一个问题,首先图像预处理步骤有一个normalize,需要用mean和std对图像进行normalize,我发现我自己算的mean和std有问题(这个问题早就知道,就是懒得去改,毕竟费时间)。刚开始不注意,但是现在模型陷入了一个瓶颈,我就想这两个参数是否对模型最后的表现有影响,就去google了下。得到了以下结论:

Pretrained models

由于训练的过程中,自己从头开心训练一个模型还是太难了,因此transfer learning还是一个重要的提速手段。对于pytroch而言,torchvision中models主要都是在imagenet上的预训练,把最后一层的fc层或classifier层去掉换成需要Linear层就能够利用已有的权重。

那么对于利用pretrained models的mean和std改怎么定这个是一个问题。谷歌后,发现了一个大佬对此做了解答,恍然大悟。

It’s the same means and stds the model was trained with on ImageNet. For most of the models from torchvision, according to pretrained_models_pytorch:

means = [0.485, 0.456, 0.406]
stds = [0.229, 0.224, 0.225]

link

如果我们使用的pretrained model,那么models是适用于imagenet的统计量(std和mean),如果想更好地利用pretrained model的权重,显然输入也要符合imagenet,因此此时应该选用imagenet的统计量,应该对tranferlearning有更好的帮助

models from scratch

如果是先自己从头训练一个model的话,我觉得还是应该要用当前任务的数据来自己算,当然大佬说这些值是任意的比较任意的:

This only matters if you are using a pretrained model. Also, means and stds of the dataset are calculated from the raw images without data augmentation as far as I know. And the values can be chosen quite arbitrarily as you can see from inceptionv3.

这里面还提到了means和std的计算方式,在不经过任何preprocessing的原图上计算的。

Reference

https://github.com/DeepVoltaire/AutoAugment/issues/4

imaterialist-product-2019比赛总结

Veröffentlicht am 2019-07-02 in deep learning

为了更好地学习pytorch,同时大佬榕也推荐了这个比赛,就拿这个比赛练手。经过2个月左右的奋斗(划水),比赛结束了,成绩是34/96。不是一个很好的成绩,但是也不是一个很差的成绩。这次主要是对这次的比赛做个总结,总结经验,为后面的比赛做一个预备吧。

这次比赛是由三个人小队组成,我,大佬榕和小许。我是队长,写了所有的pytorch代码,负责模型的训练。大佬榕和小许负责了数据集的下载。数据的下载花费了几个星期,同时训练模型也花了一个多月时间。

比赛的内容

首先讲下这个比赛的内容,是产品的细粒度的图像分类任务。什么是细粒度分类?细粒度图像分类任务中,有一些大类别,每个大类别底下还有小类别。小类别之间的差异比大类别之间的差异更加细微。在imaterialist-product-2019中,主要有4层类别,第一层共有5类,然后第二层有45类,第三层大约有百来类,最后一层则共有2019类。所有的类别的具体名字不知道,只有一个代名字,最后一层则有类别的标号。

具体的类别信息在:

​link https://storage.googleapis.com/kaggle-competitions-data/kaggle/13773/368464/product_tree.pdf?GoogleAccessId=web-data@kaggle-161607.iam.gserviceaccount.com&Expires=1562147488&Signature=QUPL60xTxNZW5c4whytfOWYuQfR5eEY0JFIpZE%2F5CE6RQXA6bPia6XpUjOtQRrkw1lhXr7HQiSdBEP1C3X23G4MkBV0CtDY2Uvyzfv3WSVQWUhEt4cbZCj68AoZKr8gtI6%2BFqddv%2FRF%2F%2FWXnbrydhKjjT6mUgg0gSVsSjAKFZJC0mO8SUwbaR9x9%2FJuGX4yxdXSv5Th5Hy%2BFskpXH24fmcbCsfQGRo5Y6hilx3UfaZAYTYZ1b2bIfmk9qvahTWuaYBtP%2F6Ta2Rhig4M3CSFx3dFR7Q79AFH0wBywd1viMRSIiNbprPcTL4spqDxy%2BS3%2FXv1Km93GlsydNBmtjMdfKQ%3D%3D

数据集的信息

类别总共是2019类。

训练样本总数是:1,004,360

验证集样本总数是:10,095

测试集样本总数是:90,834

其中训练集的图片有缺失,验证集也有。测试集没有。

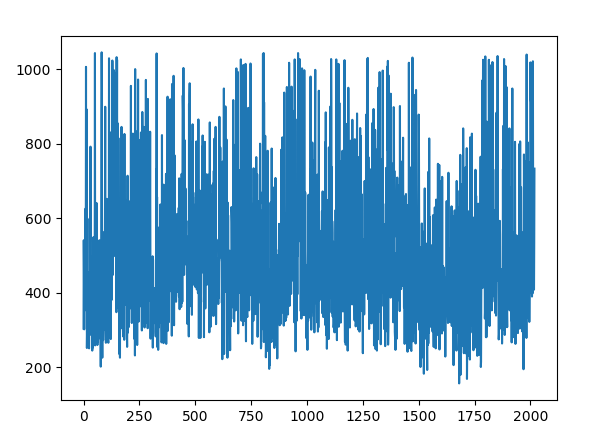
训练集中,每个类样本数最多的有 1045 ;最少的有: 157 ;

样本个数的分布图为:

1561895928822

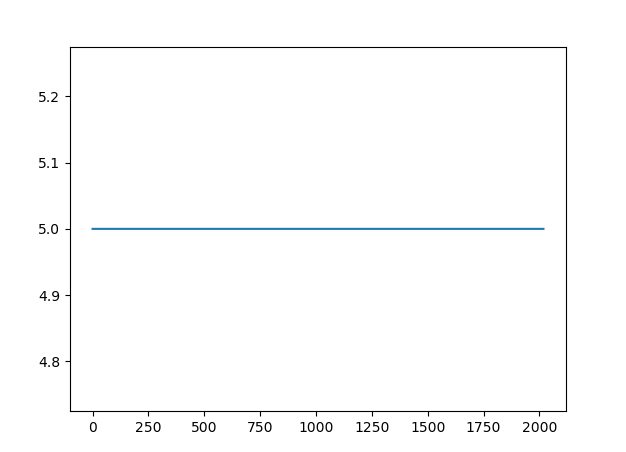
对于验证集合,所有的类别个数都为5个。样本个数分布图为:

1561896059345

可以看出训练样本集中各个类的样本数量相差很大,多的上千个,而少的一百来个,样本不均衡这个问题是一个需要解决的问题。

环境

一台带titan Xp的windows 10 机子,pytorch1.0

分类模型

采用的分类模型主要有:resnet(resnet50,resnet101,resnet161),densent(densenet161),其最好的性能列表如下:

model top-1 top-5
resnet50 59.7 86.25
resnet101 61.4 87.2
resnet161 59.5 85.7
densenet161 - 87.56

后来使用了model average的方法(其中使用了一些非最佳的模型),大概集成了8个model得到了一个最好的验证精度90.585938

训练过程的细节

数据集预处理

去除了下载中出现错误的图片

图像增强

训练:

resize(224)

randomcrop(224,224)

ColorJitter

RandomHorizontalFlip

RandomRotation

normalize

测试(验证):

resize(224)

centorcrop(224)

normalize

数据读取

用pytorch自带的dataloader,pin_memory=True, num_workers=4,batch_size 根据模型的不同,尽量取大的,并将所有的数据集放在SSD中,加快读取。

没有pin_memory 和ssd大概要4个小时一个epoch(resnet50)。

加了这两个设置,大概1.5个小时一个epoch,加速了很多。

但是一般训练一个模型还是需要2天时间(20epoches)。毕竟xp的显存只有11GB,实际中用的最多只能用10GB。

为了节省显存,采用更节约显存的sgd模型。Adam需要保存很多二阶和二阶的梯度信息,同时也没有比SGD好到那里去,因此采用SGD。

优化

所有的模型都使用了pretrained model.

所有的模型训练的epochs都小于20.

优化器:SGD with momentum

学习率调度:SGDR 和CyclicLR(由于采用了SGDR和CyclicLR,lr的一个调度的结果也被我用于集成。参考黄高的论文)

学习率区间评估:lr_find+eye see

大佬的比赛方案

比赛结束了,kaggle上出现了大佬的方案,有以下我没有做到的:

  1. 采用更好的分类模型SENET
  2. 考虑使用autoAugment图像增强
  3. 考虑类的不均衡问题
  4. 数据集中去除小图片
  5. TTA

值得一说的处理不均衡问题,我目前了解有三个方法:

  1. 上采用和下采样;同时pytorch里面也有一个加权采样器;
  2. 将训练集分成两个部分,第一部分是均衡的样本集合,每个类个数相同,该部分先用于训练模型;第二个部分是训练集剩下的部分,用于finetune上面的模型
  3. 使用加权loss比如focal loss等。

Extract Feature from a Pretrained Pytorch Model

Veröffentlicht am 2019-07-02 in deep learning

Code

1
2
3
4
5
6
import torch
import torchvision.models.vgg as models
input = torch.rand(1, 3, 5, 5)
vgg16 = models.vgg16(pretrained=True)
output = vgg16.features\[:3\](input)
print(output)

其中,vgg16.features[:3]的意思是只选取vgg16网络的前三层,然后input作为输入。

Reference

https://discuss.pytorch.org/t/extracting-and-using-features-from-a-pretrained-model/20723/11

Snapshot Ensembles

Veröffentlicht am 2019-07-02 in deep learning

Ensembles work best if the individual models

(1) have low test error and

(2) do not overlap in the set of examples they misclassify.

1558078009871

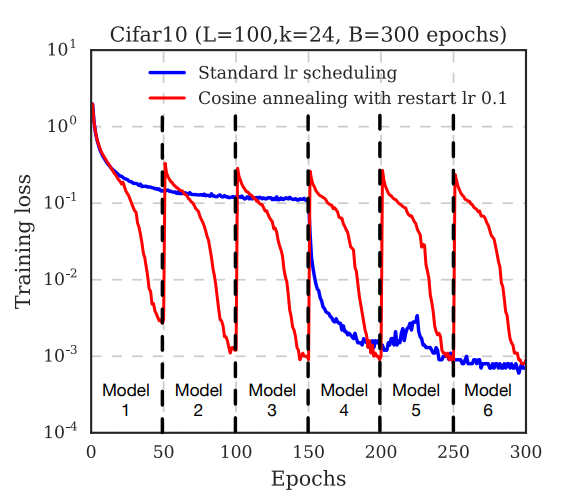
Snapshot Ensembling.

Figure 2 depicts the training process using cyclic and traditional learning rate schedules. At the end of each training cycle, it is apparent that the model reaches a local minimum with respect to the training loss. Thus, before raising the learning rate, we take a “snapshot” of the model weights (indicated as vertical dashed black lines). After training M cycles, we have M model snapshots,$ f_1$ . . .$ f_M$ , each of which will be used in the final ensemble.

Ensembling at Test Time.

The ensemble prediction at test time is the average of the last m (m ≤ M) model’s softmax outputs. Let x be a test sample and let $ h_i (x)$ be the softmax score of snapshot i. The output of the ensemble is a simple average of the last m models:

.We always ensemble the last m models, as these models tend to have the lowest test error.

Ensemble Size.

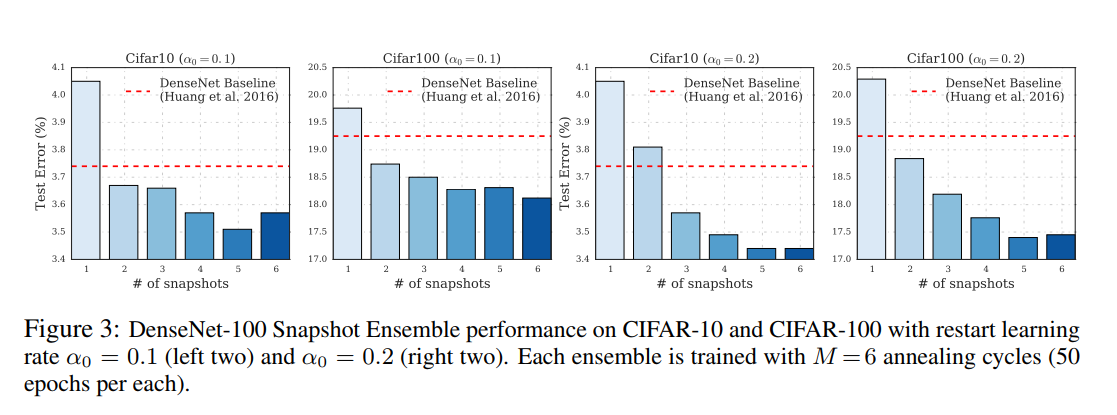
In some applications, it may be beneficial to vary the size of the ensemble dynamically at test time depending on available resources. Figure 3 displays the performance of DenseNet-40 on the CIFAR-100 dataset as the effective ensemble size, m, is varied. Each ensemble consists of snapshots from later cycles, as these snapshots have received the most training and therefore have likely converged to better minima. Although ensembling more models generally gives better performance, we observe significant drops in error when the second and third models are added to the ensemble. In most cases, an ensemble of two models outperforms the baseline model.

Restart Learning Rate.

The effect of the restart learning rate can be observed in Figure 3. The left two plots show performance when using a restart learning rate of α0 = 0.1 at the beginning of each cycle, and the right two plots show α0 = 0.2. In most cases, ensembles with the larger restart learning rate perform better, presumably because the strong perturbation in between cycles increases the diversity of local minima.

1558078640762

Git Quick Tutorial

Veröffentlicht am 2019-07-02 in 编程

I have just combined two popular tutorial for better understanding. You can found the two tutorial in the reference part, and this post was for personal understanding only.

install and setup

1
sudo apt install git-all

basic setup

save your git username and email so that you won’t have to enter them in again for future git commands

1
2
git config --global user.name "user name"
git config --global user.email "email"

colours

enable some extra colouring to git, so that you can read the output of the commands easier

1
git config --global coler.ui true

create a new repository

using the starndard ‘cd’ command to navigate the directory you want to setup version. Now you can initialize a git repository like this:

1
git init

this create a new subdirectory name .git that contained all of your necessary repository files - a Git repository skeleton. At this point, nothing in you project in tracked yet.

checkout a repository

1
git clone /path/to/repository

when using a remote server, your command will be

1
git clone username@hose:/path/to/repository

workflow

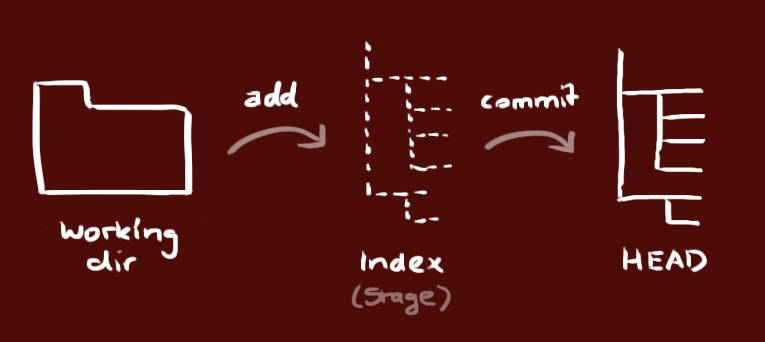
local repository consists of three “trees” maintained by git. the fist one is your Working Directory which holds the actual files. the second one is the Index which acts as a staging area (充当临时区域) and finally the HEAD which points to the last commit you’ve made.

1562033018197

add & commit

To start version-controlling existing files you should start by tracking those files and do an initial commit. To accomplish that, you start by adding the files to git that you would like to be attached to you git project.

you can popose changes (add it to the Index) using

1
git add <filename>
1
git add *

This is the first step in the basic git workflow. To actually commit these change use

1
git commmit -m "commit message"

Now the file is committed to the HEAD, but no in your remote repository yet.

remote backup

if you want to save and backup your project remotely, you’ll need to create a remote repository on GitHub. So first head on over github.com and create a repository. Then, use the link of the repository to add it as the origin of your local git project i.e. where that code wil be stored

1
2
git remote add origin \
https://github.com/user/repo.git

then you can go ahead and push you code to github… you’ve backed up your code

1
git push origin master

pushing changes

your changes are now in the HEAD of your local working copy. To send those changes to your remote repository, execute

1
git push origin master

change master to whatever branch you want to push your changes to

If you have not cloned an existing repository and want to connect your repository to a remote server, you need to add it with

1
git remote add origin <server>

Now you are able to push your changes to the selected remote server.

status checking

git status can used to determine which files are in which state.

It allows you to see which of your files have already been committed and which haven’t. If you run this command when all files have already been committed and pushed, you should see something like this:

1
2
3
git status
# On branch master
nothing to commit (working directory clean)

If you add a new file to your project, and the file didn’t exist before, when you run git status you should see your untracked file like this:

1
2
3
4
5
6
7
$ git status
# On branch master
# Untracked files:
# (use "git add <file>..." to include in what will be committed)
#
# README
nothing added to commit but untracked files present (use "git add" to track)

This make git status really useful for a quick check of what you have backed up already and what you only have locally.

advanced file adding

Instead of trying to look for all the files that have changed and adding them one-by-one, we can do the following:

1
2
3
4
5
6
7
8
9
10
11
### Adding files one by one
git add filename

### Adding all files in the current directory
git add -A

### Adding all files changes in the current directory
git add .

### Choosing what changes to add (this will got through all your ### changes and you can 'Y' or 'N' the changes)
git add -p

advanced commits

if you want to do something more elaborate you’ll need a bit more:

1
2
3
4
5
6
7
8
9
10
11
12
13
14
15
16
17
18
19
20
21
22
23
24
### Commit staged file(s) 
### This is typically used for shorter commit messages
git commit -m 'commit message'

### Add file and commit in one shot
git commit filename -m 'commit message'

### Add file and commit staged file
git commit -am 'insert commit message'

### Changing your most recent commit message
git commit --amend 'new commit message'

# Combine a sequence of commits together into a single one
### You might use this to organise a messy commit history
git rebase -i
### This will give you an interface on your core editor:
# Commands:
# p, pick = use commit
# r, reword = use commit, but edit the commit message
# e, edit = use commit, but stop for amending
# s, squash = use commit, but meld into previous commit
# f, fixup = like "squash", but discard this commit's log message
# x, exec = run command (the rest of the line) using shell

Branching and merging

The master branch of your GitHub repository should always contain working and stable code. However, you may want to also back up some code that you are currently working on, but isn’t entirely stable. Maybe you’re adding a new feature, you’re experimenting and breaking the code a lot, but you still want to keep a back up to save your progress!

Branching allows you to work on a separate copy of your code without affecting the master branch. When you first create a branch, a complete clone of your master branch is created under a new name. You can then modify the code in this new branch independently, including committing files and such. Once you’re new feature has been fully integrated and the code is stable, you merge it into the master branch!

branching

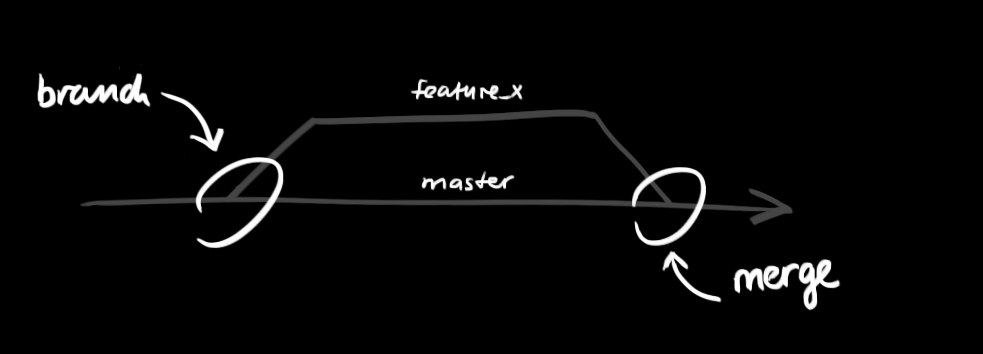
branches are used to develop features isolated from each other. The master branch is the “default” branch when you create a repository. Use other branches for devolopment and merge then back to the master branch upon compleiton.

1562034120363

create a new branch named ‘feature_x” and switch to it using

1
git checkout -b feature_x

switch back to master

1
git checkout master

and delete the branch again

1
git branch -d feature_x

a branch is not available to others unless you push the branch to you remote repository

1
git push origin <branch>

Here’s all of the things you need to create and work on a branch:

1
2
3
4
5
6
7
8
9
10
11
12
13
14
15
16
17
18
19
20
21
22
23
24
25
26
27
28
29
30
31
32
33
34
35
### Create a local branch to work on
git checkout -b branchname

### Switching between 2 branches
git checkout branch_1
git checkout branch_2
### Pushing your new local branch to remote as backup
git push -u origin branch_2

### Deleting a local branch - this won't let you delete a branch ### that hasn't been merged yet
git branch -d branch_2

### Deleting a local branch - this WILL delete a branch even if it ### hasn't been merged yet!
git branch -D branch_2

### Viewing all current branches for the repository, including both ### local and remote branches. Great to see if you already have a ### branch for a particular feature addition, especially on bigger ### projects
git branch -a

### Viewing all branches that have been merged into your current ### branch, including local and remote. Great for seeing where all ### your code has come from!
git branch -a --merged

### Viewing all branches that haven't been merged into your current ### branch, including local and remote
git branch -a --no-merged

### Viewing all local branches
git branch

### Viewing all remote branches
git branch -r

# Rebase master branch into local branch
$ git rebase origin/master

# Pushing local branch after rebasing master into local branch
$ git push origin +branchname

update & merge

to update your local repository to newest commit, execute

1
git pull

in your working directory to fetch and merge remote changes.

to merge another branch into your active branch (e.g. master), use

1
git merge <branch>

in both cases git tries to auto-merge changes. unfortunately, this is not always possible and results in conflicts, you are responsible to merge those conflicts manually by editing the files shown by git. After changing, you need to mark them as merged with

1
git add <filename>

before merging changes, you can also preview them by using

1
git diff <source_branch> <target_branch>

Once you’re done adding the new feature to your branch, you’ll want to merge it back into the master branch, so that your master has all of the latest code features.

1
2
3
4
5
### First make sure you're looking at master branch
git checkout master

### Now merge your branch to master
git merge branch_2

tagging

it’s recommended to create tags for software releases, this is a known concept, which also exists in SVN. you can create a new tag named 1.0.0 by executing

1
git tag 1.0.0 1b2e1d63ff

1b2e1d63ff stands for the first 10 characters of the commit id you want to reference with your tag. you can get the commit id by looking ant the …

replace local changes

In case you did something wrong, which for sure never happends :), you can replace local changes using the command

1
git checkout --<filename>

this replace the changes in your working tree with the last content int HEAD. Changes already added to the index, as well as new files, will be kept.

if you instead want to drop all your local changes and commits, fetch the latest history form the server and point your local master branch at it like this

1
2
git fetch origin
git reset --hard origin/master

Fixing mistakes and backtracking

Mistakes happen …. and they happen frequently with coding! The important thing is that we’re able to fix them.

Have no fear here! Git has everything you need in case you make a mistake with the code you push, overwrote something, or just want to make a correction to something you pushed.

1
2
3
4
5
6
7
8
9
10
11
12
13
14
15
16
17
### Switch to the version of the code of the most recent commit
git reset HEAD
git reset HEAD -- filename # for a specific file
### Switch to the version of the code before the most recent commit
git reset HEAD^ -- filename
git reset HEAD^ -- filename # for a specific file
### Switch back 3 or 5 commits
git reset HEAD~3 -- filename
git reset HEAD~3 -- filename # for a specific file
git reset HEAD~5 -- filename
git reset HEAD~5 -- filename # for a specific file
### Switch back to a specific commit
### Where the '0766c053' is the commit ID
git reset 0766c053 -- filename
git reset 0766c053 -- filename # for a specific file
### The previous commands were what's known as "soft" resets. Your ### code is reset, but git will still keep a copy of the other code ### handy in case you need it. On the other hand, the --hard flag ### tells Git to overwrite all changes in the working directory.
git reset --hard 0766c053

Reference

https://rogerdudler.github.io/git-guide/

https://medium.com/@george.seif94/a-full-tutorial-on-how-to-use-github-88466bac7d42

Hello World

Veröffentlicht am 2019-07-02

Welcome to Hexo! This is your very first post. Check documentation for more info. If you get any problems when using Hexo, you can find the answer in troubleshooting or you can ask me on GitHub.

Quick Start

Create a new post

1
$ hexo new "My New Post"

More info: Writing

Run server

1
$ hexo server

More info: Server

Generate static files

1
$ hexo generate

More info: Generating

Deploy to remote sites

1
$ hexo deploy

More info: Deployment

123
Zhiwei Liu

Zhiwei Liu

27 Artikel
3 Kategorien
29 schlagwörter
GitHub
© 2019 Zhiwei Liu
Erstellt mit Hexo v3.9.0
|
Design – NexT.Muse v7.2.0