I have just combined two popular tutorial for better understanding. You can found the two tutorial in the reference part, and this post was for personal understanding only.
install and setup
1 | sudo apt install git-all |
basic setup
save your git username and email so that you won’t have to enter them in again for future git commands
1 | git config --global user.name "user name" |
colours
enable some extra colouring to git, so that you can read the output of the commands easier
1 | git config --global coler.ui true |
create a new repository
using the starndard ‘cd’ command to navigate the directory you want to setup version. Now you can initialize a git repository like this:
1 | git init |
this create a new subdirectory name .git that contained all of your necessary repository files - a Git repository skeleton. At this point, nothing in you project in tracked yet.
checkout a repository
1 | git clone /path/to/repository |
when using a remote server, your command will be
1 | git clone username@hose:/path/to/repository |
workflow
local repository consists of three “trees” maintained by git. the fist one is your Working Directory which holds the actual files. the second one is the Index which acts as a staging area (充当临时区域) and finally the HEAD which points to the last commit you’ve made.
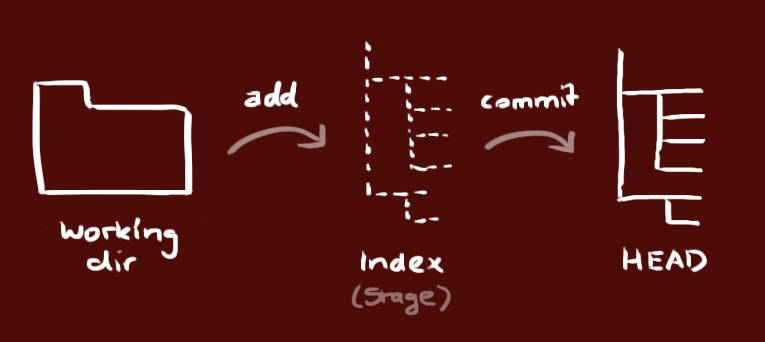
add & commit
To start version-controlling existing files you should start by tracking those files and do an initial commit. To accomplish that, you start by adding the files to git that you would like to be attached to you git project.
you can popose changes (add it to the Index) using
1 | git add <filename> |
1 | git add * |
This is the first step in the basic git workflow. To actually commit these change use
1 | git commmit -m "commit message" |
Now the file is committed to the HEAD, but no in your remote repository yet.
remote backup
if you want to save and backup your project remotely, you’ll need to create a remote repository on GitHub. So first head on over github.com and create a repository. Then, use the link of the repository to add it as the origin of your local git project i.e. where that code wil be stored
1 | git remote add origin \ |
then you can go ahead and push you code to github… you’ve backed up your code
1 | git push origin master |
pushing changes
your changes are now in the HEAD of your local working copy. To send those changes to your remote repository, execute
1 | git push origin master |
change master to whatever branch you want to push your changes to
If you have not cloned an existing repository and want to connect your repository to a remote server, you need to add it with
1 | git remote add origin <server> |
Now you are able to push your changes to the selected remote server.
status checking
git status can used to determine which files are in which state.
It allows you to see which of your files have already been committed and which haven’t. If you run this command when all files have already been committed and pushed, you should see something like this:
1 | git status |
If you add a new file to your project, and the file didn’t exist before, when you run git status you should see your untracked file like this:
1 | $ git status |
This make git status really useful for a quick check of what you have backed up already and what you only have locally.
advanced file adding
Instead of trying to look for all the files that have changed and adding them one-by-one, we can do the following:
1 | ### Adding files one by one |
advanced commits
if you want to do something more elaborate you’ll need a bit more:
1 | ### Commit staged file(s) |
Branching and merging
The master branch of your GitHub repository should always contain working and stable code. However, you may want to also back up some code that you are currently working on, but isn’t entirely stable. Maybe you’re adding a new feature, you’re experimenting and breaking the code a lot, but you still want to keep a back up to save your progress!
Branching allows you to work on a separate copy of your code without affecting the master branch. When you first create a branch, a complete clone of your master branch is created under a new name. You can then modify the code in this new branch independently, including committing files and such. Once you’re new feature has been fully integrated and the code is stable, you merge it into the master branch!
branching
branches are used to develop features isolated from each other. The master branch is the “default” branch when you create a repository. Use other branches for devolopment and merge then back to the master branch upon compleiton.

create a new branch named ‘feature_x” and switch to it using
1 | git checkout -b feature_x |
switch back to master
1 | git checkout master |
and delete the branch again
1 | git branch -d feature_x |
a branch is not available to others unless you push the branch to you remote repository
1 | git push origin <branch> |
Here’s all of the things you need to create and work on a branch:
1 | ### Create a local branch to work on |
update & merge
to update your local repository to newest commit, execute
1 | git pull |
in your working directory to fetch and merge remote changes.
to merge another branch into your active branch (e.g. master), use
1 | git merge <branch> |
in both cases git tries to auto-merge changes. unfortunately, this is not always possible and results in conflicts, you are responsible to merge those conflicts manually by editing the files shown by git. After changing, you need to mark them as merged with
1 | git add <filename> |
before merging changes, you can also preview them by using
1 | git diff <source_branch> <target_branch> |
Once you’re done adding the new feature to your branch, you’ll want to merge it back into the master branch, so that your master has all of the latest code features.
1 | ### First make sure you're looking at master branch |
tagging
it’s recommended to create tags for software releases, this is a known concept, which also exists in SVN. you can create a new tag named 1.0.0 by executing
1 | git tag 1.0.0 1b2e1d63ff |
1b2e1d63ff stands for the first 10 characters of the commit id you want to reference with your tag. you can get the commit id by looking ant the …
replace local changes
In case you did something wrong, which for sure never happends :), you can replace local changes using the command
1 | git checkout --<filename> |
this replace the changes in your working tree with the last content int HEAD. Changes already added to the index, as well as new files, will be kept.
if you instead want to drop all your local changes and commits, fetch the latest history form the server and point your local master branch at it like this
1 | git fetch origin |
Fixing mistakes and backtracking
Mistakes happen …. and they happen frequently with coding! The important thing is that we’re able to fix them.
Have no fear here! Git has everything you need in case you make a mistake with the code you push, overwrote something, or just want to make a correction to something you pushed.
1 | ### Switch to the version of the code of the most recent commit |
Reference
https://rogerdudler.github.io/git-guide/
https://medium.com/@george.seif94/a-full-tutorial-on-how-to-use-github-88466bac7d42